Search This Blog

Thursday, February 19, 2015

This Is For The Birds


               Breaking My Cabin Fever

 Sometimes life can get in a rut, this time of year it can also be called Cabin Fever.  When your stuck in the the house and can't get out sitting at the keyboard can make you feel even more trapped so I decided to do something different.  Over the years I have written several How-to posts on a variety of subjects. So I decided to do a couple posts and try to break my fever.  My only entertainment the last few days has filling the bird feeders.  Fortunately I had stocked up on bird food shortly before the foul/fowl (whichever is appropriate) weather hit.


The first picture is my main feeder.  Actually it is seven feeders in one. All the feeders except for the suet feeder I made myself.  There are seventeen bird feeders in my back yard. The feeder pictured started out as just two feeders but grew into what it is for a couple reasons. Originally it was just the bottom cross arm but the orange pan feeder on the left was to close to the ground and to much temptation for my cats. I decided to use a piece of scrap I had and raise the feeder farther from the ground. Then it looked lop sided so I took another piece of scrap and added the upper cross member. I don't think I have $10 in the whole thing which was for the main post. The rest was scrap form other projects.

Why so many feeders you might ask? Well besides liking birds, there is another reason. I make and sell the feeders at farmers markets and flea markets to make extra spending money and give me something to do.  In

the course of selling them I have to explain the benefits of each feeder, but by having pictures with each stack of feeders and plenty of birds of different types on them they tend to sell themselves. Saving me the redundant descriptions.


This is a picture of my best selling feeder and the picture says it all. The birds like it and it gets a great variety of birds notice the Cardinals, both male and female, the Blue Jay on the right and the Downy Woodpeckers one on the small tree in the foreground and one harder to see below the Bluebird. It has a screen bottom to let the moisture out so the food does not rot and stays dry in bad weather.


This is one of my favorite feeders and shows you can make one out of anything just about. I call these my Redneck Feeders. I use detergent bottles and milk bottles and sometimes I spray them in bright colors. I sell them for three to five dollars.  A razor knife, and a drill and you are in business. Notice all the small holes around the bottom edges to let the moisture out. I usually make the holes with a 3/16th bit.  I drill a 1/4 inch hole in the cap for the piece of clothesline I make the hangar from. It helps to put a metal washer on the line before you thread it through the cap as it keeps the knot from pulling through the plastic.   It has been my pleasure to get some decent pictures and hopefully I can share some of my techniques  with my readers.  As I said earlier my other thing besides writing is crafts and one of my main crafts is making birdhouses and bird feeders from recycled materials.  I
also make them from gourds.


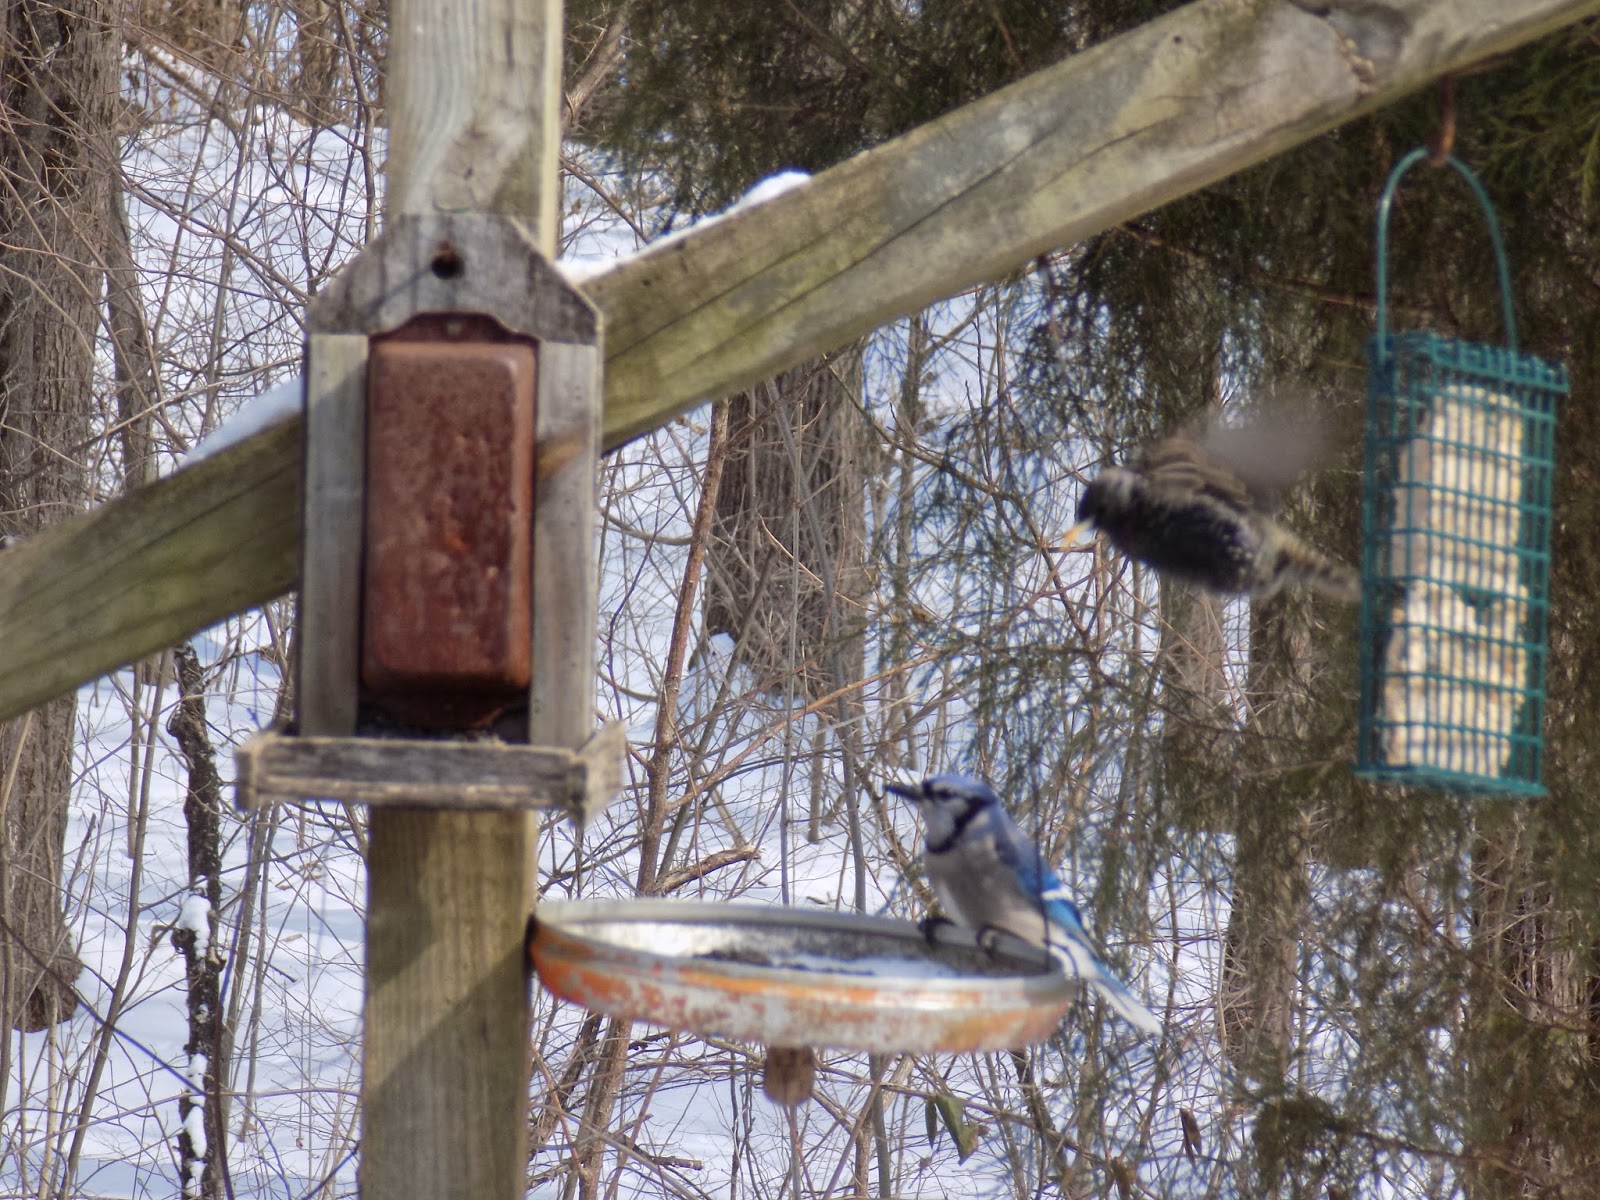
 This is a picture of the most popular feeder from a birds point of view. I simple drilled a hole in the side of the lid and many holes around around where the feed goes, again to let out moisture.  Birds don't like soggy food.  It can get wet, but they don't like it in standing water. There is a piece of wire going up to the cross arm above the Blue Jay. It helps to give the pan support.  It is simply a piece of coat hanger.  Not exactly high tech.  The rusted feeder on the pole is simply and old baking pan that I made a track for the lips of the pan to go down into.  If you zoom in you will see I keep the pay from going all the way down by simply putting a couple nails in the way of the pan lips.


Pans are a fun way to make a variety of feeders and I use them a lot.  I get them at second hand stores, yard sales, auctions and any place I find them. The key to any good feeder is plenty of drainage holes.  The strings of shiny things tend to attract birds to the feeder.  Especially important if you have a yard with only one or two trees. The bottom pan should always be an inch or so smaller than the top pan. You need the lips of the pans to be about 5 to 7 apart so you can get the food in them. The one pictured has a threaded rod running thru a piece of wood from an old shelf unit.  The top piece is a fennel ring from a lamp.  You can find them in hardware and building supply stores or do like I do and save the parts of lamps I buy at auctions for a few cents and tear apart to scrap or recycle. I also sometimes use lag screw type eye-bolt for the top and a 1 1/2 inch by 1/4 inch lag screw which you can get at most hardware and building supply stores. The screws tend to be cheaper than the fennel rings and threaded rod.  Of course I get a lot of threaded rod from the lamps I take apart for the copper in them.


Another favorite of mine is recycled bottles and pans.  The one below is from a pan lid and top and an old mayo bottle.  I usually leave the labels on but after a while they come off unless you covet them with varnish. On the top I simply enlarge the hole and use a short bolt to screw into the fennel ring. It helps when you put the bolt through the bottle from the inside to put on a washer so it does not tear the bottle and you can tighten it to the fennel ring.  I cut about and 1 1/2 inch hole in the center of the bottle cap. Then I lay the cap in the center of the pan and drill three or four 1/4 inch hole in a circle around the bigger hole I made.and through the bottom pan.  Then I use wood beads, sewing spools or washers to lift the lid up and make space for the feed to flow out of the bottle into the pan.  I use about 1 and 1/2 inch long 1/4 inch diameter threaded screws with nuts. You can put the nuts inside the feeder or outside. I prefer inside so they do not detract from the appearance, but either way you have to make sure there is room to the thread on the cap.


The main reason for so many feeders is that the more feeders you have and the more types of the feed the more types of birds you will be able to attract.

Of course you may get a few kinds of birds you do not care to attract.  Field birds are not as pretty but they get hungry also.Blue Jays tend to be bullies and run all the other birds off.  However, Woodpeckers rule.  Even the little Downy's will run off the big bad Blue Jays, but Downy's will let about any other birds eat with them.  It's the Jays that leave by choice because they do not like to share. Hope you enjoyed this as much as I did taking the pictures for it. And making the feeders of course.


Downy's Rule

Okay guys somebody move over.


Think we need to leave anything for the Jays?


What is left for me?


Professional Bird Watchers Prefer my feeders.

Watch for my post in a couple of weeks on How-to build the greenhouse in the picture for less than $150. dollars. Start you own plants and enjoy getting outside.


Monday, February 9, 2015

How-to Recycled and Cheap Starting Pots for Spring Planting.


Annual Update

With Spring just around the corner its time to start your plants. I thought it might be a good time to update and share this post from 9/16/13 on how to make super cheap and handy starting pots for your plants


The Perfect (Recycled) Pot For Starting Cuttings Or Making Cheap Planting Pots

Sometimes we have to make a better mousetrap.   I like all the ideas on Pinterest but I also like to deal with and use what I have at hand. Many of the posts on Pinterest use two liter bottles as miniature greenhouses At my house people drink pop from cans so I do not have a supply of two liter bottles.  My good luck is that they drink a lot of milk.  So rather than throw the bottles away I have learned to make starter containers out of them.  The milk jugs have several advantages over the two liter bottles.You will notice the bottles have indents on the sides. The indents help keep the lids in place when it is windy. Some don’t have the indents but that is not a problem.


The first picture shows what a container looks like.


 The markings in picture two show how and where the cut lines are.  Yes it takes two bottles to make one container, but hey you were going to throw it away anyhow right.  If I run short I go to the recycle center and get a trash bag full for nothing or next to nothing.  If you ask friends to save them for you they will be coming out your ears.  One word of advice as it may be awhile before you use them.  Rinse them out before you store them.


,


For the top you cut above the handle and then down each side of the handle and go down maybe three quarters of the way. You want it to cover the container and keep out the weather.

Pictures three and four show what the two separate cuts look like. Notice picture three the cut goes down the corners.  Picture five lets you see that the cap cut leaves a lot of the back on so it can help hold the cap on the container. The key is how you cut the handle.  On the pot part of the container you want to save the handle so you can use it to move the container when you have to.  The lid however does not need the handle but a little tab of it helps line it up when you put the cover on.   When you cut the container, you cut between the cap and the handle.  Then you cut to the top of the shoulders on each side of the jug.  Then down about a quarter of the way.  You can adjust this based on what you are starting.  I like to have four to five inches of dirt. I usually put four to five rose cuttings in each container.  With butterfly bushes I only put two or three.  Some plants I only put one cutting in.  That is up to you.  Cuttings on some plants are easy to do.  Others the success rate is not as high.  If you are successful and several take off, simply re-pot them once they have a well established root system and keep them in the pots till they are read to go into the ground


Drainage slits in the bottom do not have to be big or fancy, but they are important for plant health and growth.  Most plants don't like wet feet. Cutting the slits in the bottom lets excess water move on through the pot, just like rain does in the soil.


The upside of these containers is that they are cheap and it keeps plastic out of the landfill, at least for a while.  The down side is you can’t see the plant very well without removing the cover but the cover is very easy to take off and to put back. That is a plus to this design that you can open it to the weather when you want. Another benefit is they do not get quite as hot as the clear plastic.  I used to buy pots for taking my plants to market.  Doing them this way I can sell them a little cheaper.  If you want to you can take them to market in the milk container and the handle makes them real easy move around and load.  You can also write on the plastic what kind of plant it is.  I use spray paint to color code my plants.  Especially stuff like melons and gourds that all look very similar at the start of the growing cycle. I grow eight kinds of gourds and each type has its own color on the pot.  This helps avoid confusion.


Some plants are more sensitive to transplant shock than others.  Sometimes I grow plants bigger in the container to make them sell better. I tell people to cut on the dotted line and put their hand in under the plant and just ease it out.  No stress or damage to the plant occurs this way.  Of course you can’t reuse the container if you cut it(Unless you believe in duct tape) but hey it was trash when it started and to trash it has returned   It is the old ashes to ashes and dust to dust thing .

Another point learned the hard way. When I take them inside and sit them on the window ledge I put them in an old pie tin to prevent water damage.  I like to use the Tennessee Spinner Gourds to make hanging baskets.  They have pretty yellow blooms and will trail down nicely.  The one at the bottom is full size.  They get about the size of an egg or a little smaller. When dried they make nice little tops if you spin them right. Which is where the name Spinners comes from. The hanging plant below is a Tennessee Spinner Plant


These are totally recyclable and you can use them year after year or till the plastic becomes brittle.  Using a pie tin also allows you to put them in a macrame or wire hanger and put them up off the cold ground and out of the weather.You can get the pans at yard sales and Good Will or the Salvation Army.  Sometimes I will make the ultimate sacrifice and actually eat a pie.

It is important to pay attention to where you put the containers.  While plants love sunshine, cuttings need TLC and just subdued light part of the day is usually fine.  Direct sun can have the undesired effect of turning the container into a microwave oven and finish the plant before it gets started.


With Spring Just Around the Corner Watch For my Post on How to build your own like the one in the picture

Portable $150 Greenhouse like the one pictured. Easy to make, move and store. My most recent post shows the portable greenhouse in more detail. Unfortunately the price has grown to $239 because of inflation over the years.